27/08/2018
A standout feature of a large proportion of prime residences in Australia is a beautiful in-property garage. Even if you don’t have a car, a garage can become an extra storage room, hobby space or even an entertainment area.
It’s all in how you lay it out and how you maximise its functionality.
The state of a garage can alter the feel of the property as a whole; it is, after all, an extension of your home. A garage renovation therefore requires a lot of thought and a clear plan, according to 3 Pea’s Property Styling founder Jo Powell.
.jpg)
“As garage conversions tend to be more cosmetic and less structural, it’s easy to feel you can make decisions on the fly, but this will cost more in the long run,” she says.
When renovating an aspect of the home that could affect areas beyond the boundaries of the property itself, Powell advises contacting local authorities early on to find out if you will need special permits for the project, as subsequent governmental red tape could cause delays.
She also highlights the importance of having what you need for the renovation ahead of time, including people and materials.
“Ensure that all your trades are booked before you commence – don’t rely on being able to get someone on short notice,” Powell says.
“Purchase all materials ahead of the beginning the project. This will help to prevent budget overruns and delays caused by not having what you need on hand.”
“It’s easy to feel you can make decisions on the fly, but this will cost more in the long run”
 STEP ONE: CONSIDER VENTILATION
The amount of ventilation you need will depend on what the purpose of the renovated garage will be.
Will it be a storage space? Then a window may suffice. But if you intend for it to be a place where people will hang out, a door may be more suitable. Alternatively, the entranceway can be filled in to fully integrate the garage with the indoors.
“Assess the level of natural light and ventilation to the area to help you make this decision,” Jo Powell advises.
“Don’t forget to consider how to block external access and how this will impact the street appeal of the property.”
TOP TIP
Don’t neglect security when deciding upon ventilation – windows should be made of toughened safety glass, and they should close firmly to avoid break-ins. Protect the room against the elements by sealing openings properly.
 STEP TWO: PLAN YOUR POWER OUTLETS
With technology becoming an irreplaceable part of life, nowadays every room in the house needs a good power outlet (or five). Especially if you plan to use the room as a hobby space, you will need a lot of electricity, and to wire the garage accordingly.
“How the space will ultimately be used should be the basis for planning the location of light fittings and power outlets, as pre-wiring before plastering will help keep costs down,” Powell says.
Unless you’re a professional electrician, don’t risk installing additional power outlets yourself, as with all electrical work it is best to get a professional on board.
TOP TIP
Weatherproof? Not weatherproof? Knowing the purpose of the garage – and therefore how often it will be affected by the elements – will help you decide what kind of power outlets you need.
 STEP THREE: MATCH THE FINISH
To make a garage feel more like a part of the home, have it blend in with the overall design by going for a matching finish. This gives the illusion of widening the garage space, because it flows seamlessly into other rooms.
Drywall is generally the default finish for existing garages. It doesn’t always need replacing – the wall can be jazzed up with a cleaning or a fresh coat of matching paint and by filling in existing holes and dents.
“Pay particular attention to cornices, skirting boards and architraves, as matching these will help to ensure that the renovation feels part of the house as a whole,” Powell says.
TOP TIP
Seal the walls properly against the weather – don’t leave room for pests to come in or for the elements to ruin your work from the inside. Use paint that is resistant to moisture and mildew.
.PNG) STEP FOUR: LAY THE RIGHT FLOORING
STEP FOUR: LAY THE RIGHT FLOORING
The garage can see more of the outdoors than many other parts of the property, so it’s important to install strong flooring that is resistant to wear and tear.
Floor tiles that have been developed specifically for garages are perfect for those who want to DIY, as this type of flooring is easy to apply, especially if it comes with peel-and-stick backing. The material is cushioned, which means it absorbs impact from heavy objects and minimises noise.
Coatings are another option – popular picks are epoxy and latex paint. However, epoxy should be installed by a professional to avoid costly problems.
TOP TIP
Clean the floor regularly, especially if you’re parking in the garage. While some coatings that are not waterproof will require acetone to clean up, tiles and mats may need only soapy water.
.jpg)
.PNG)
STEP FIVE: ADD LIGHT ACCORDINGLY
As in the transformation of any room, lighting is an essential part of garage renovation. It can be both decorative and functional, to suit whatever purpose the room will serve.
For instance, if you’ll be parking your car there, the garage should be equipped with bright-white lighting so you can see well enough to park your car safely.
If the plan is to create a clever hobby space, then strong lighting will enable you to see tools and parts better when you’re repairing items and working with small parts. LED lights are often a good bet, as they are quite bright while saving energy and being long-lasting.
TOP TIP
Consider the height of the garage ceiling before choosing lights. “The ceiling in a former garage is likely to be reasonably low, making downlights a sensible, economical and practical choice,” Powell says.
 STEP SIX: MAXIMISE NATURAL LIGHT
Letting natural light into a room is one of the best ways to make it feel fresher and more open, so capitalising on available natural light will improve the appeal of the space.
“Selecting a paint which is light in colour will help to bounce all available natural light around the space,” Powell says.
Many buyers go for paint jobs, whereas others prefer wallpaper. The latter is a great option for creating a unique ‘wow’ factor.
Meanwhile, light-coloured walls not only maximise the available light from outside but also make the garage feel bigger.
TOP TIP
“Textured wallpaper provides an excellent option to show some personality, whilst still keeping the space light,” Powell says. Paintable wallpapers are a great choice because they let you colour the walls your way but are easily removable.
 STEP SEVEN: HAVE AN EMERGENCY EXIT
It’s a good idea to have a spare exit COST point in your home in case of an emergency – and at least you won’t need to wait for the garage door to slowly open. By installing a door, it also opens up another entrance for guests if you plan to use the garage to entertain.
A glazed door allows even more natural light into the space during the day, while maintaining privacy. Make sure to reinforce the area where the door will be installed properly, however, and take pains to keep the new entryway secure.
TOP TIP
Consider installing a quality interior door. “Ensuring that light from adjoining spaces can spill into the renovated room via a glazed internal door can help enormously,” Powell explains.
 STEP EIGHT: SOUNDPROOF IT
Many an annoyed neighbour has COST complained about a garage band. So it’s important to ensure that the space is properly soundproofed, especially if you expect that whatever you use the garage for will create noise.
A popular way of minimising sound transfer is with the use of insulation panels, which pad and therefore thicken the walls. Carpets on the floor can also limit vibration.
Glass is a strong amplifier of sound as well, so heavy curtains across the door and windows should dampen noise significantly. You can always throw them open again once things have quietened down.
TOP TIP
Acoustic batts are typically installed in the ceiling, on the walls and between the floors of a multistorey home. This means they not only keep sound walled in but also help to keep out external noise, like the sound of rain.
.jpg) CASE STUDY
CASE STUDY
When Jo Powell stepped through the doors of her garage renovation project on the outskirts of Ballarat in 2016, what she saw was potential.
“The garage was attached to the house, accessed via an existing door off the dining room. This space was perfect for a conversion as it already had direct access from the house and a window in situ,” she says.
“This made the renovation very straightforward as no major structural amendments were required.”
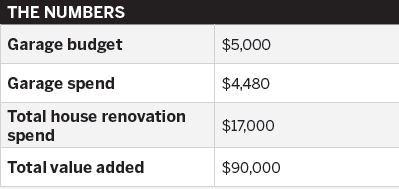
The garage had been not been used for its original purpose – rather, it was festooned with potted plants, serving as a recreational spot with outdoor seating. Powell aimed to fully transform it into an extra living space while staying within her set budget.
As it was, the garage was unlined, and no plasterwork had been done. One of Powell’s first tasks was to plaster the walls and ceiling, then add a coat of paint. She also installed carpeting to beautify the floor, at the same time limiting vibrations and noise and creating a warm atmosphere.
1.jpg) In addition, Powell wired the room to facilitate the installation of downlights and power outlets, enhancing the lighting of the space for its new use, as well as expanding its capacity to handle more gadgets and appliances. This also limited expenditure.
In addition, Powell wired the room to facilitate the installation of downlights and power outlets, enhancing the lighting of the space for its new use, as well as expanding its capacity to handle more gadgets and appliances. This also limited expenditure.
Since the garage was connected to the interior of the property, Powell sought to unify its aesthetic with that of the main house. She took advantage of the existing window, which faced south, to maximise natural light.
“Selecting finishes that match the existing house will help the new renovation blend in and appear cohesive, [along with] installing [matching] door and window hardware,” she explains.
Ultimately, Powell was able to achieve her goal of keeping the reno within a reasonable budget.
“We kept within budget by carefully planning in advance what was required, establishing a timeline and ensuring the various trades had access to complete their works as scheduled,” she says.
“Obtaining quotes and sourcing fixtures and fittings at the beginning meant we knew as accurately as possible what the project was going to cost.”
 Jo Powell
s the founder
of 3 Pea’s Property Styling