10/05/2018
With the popularity of celebrity ‘home cooking’ shows, the appeal of a beautifully designed kitchen has increased in recent years. Double ovens and marble benchtops were formerly found in only the wealthiest suburbs, but these days everyone wants in on a well-stocked cooking space that makes meal prep and entertaining fun!
While it might be difficult to have the budget of a celebrity chef, there’s no reason why you can’t pull off a beautiful renovation at an aff ordable price. A great kitchen can play a valuable role if you’re looking to sell or rent, as it is one of the homiest areas of a property.
If you’re looking to renovate then onsell and make a profit, it pays to get to know the current trends and what buyers or tenants will be looking for in a properly furnished kitchen. You will obviously seek to save, but don’t go too low-budget on materials – people can see through cheap, quick-fix solutions, which are a major turnoff .
“As a rule of thumb, aim to spend 2% of the property’s renovated value on your kitchen renovation,” says Julie Anglesey, founder of Renovating Made Easy.
Furniture superstores like Bunnings and IKEA offer kitchen design services to help you figure out what you can do with your space. The plans they come up with can also help you coordinate the services of your electrician and plumber.
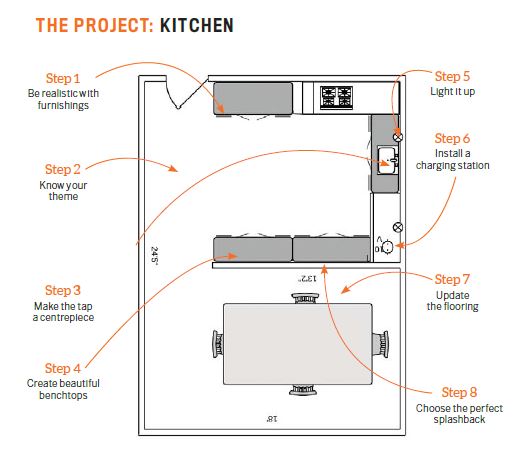
 STEP ONE: BE REALISTIC WITH FURNISHINGS
It’s easy to become overwhelmed by a large kitchen space, which may cause you to overspend on appliances and flashy furnishings that are not actually necessary. Being strict with your budget helps you keep things realistic.
“Being realistic enabled me to be comfortable with choosing laminate benches, cupboards with door fronts, and inexpensive appliances,” Anglesey explains.
The important thing is to have sturdy working equipment, even if it may not be ‘TV worthy’. Seek out diff erent sources, like discount stores or Gumtree, to find quality appliances at affordable prices. IKEA is a good place to get basic cupboards.
TOP TIP
Allot adequate time to research prices of materials and appliances. Avoid buying on a whim as you could wind up blowing a chunk of your budget on something that could have come cheaper
 STEP TWO: KNOW YOUR THEME
Are you renovating for personal use, to increase your rent, or to make a sale? The purpose of your renovation can influence which direction you go in with regard to the design of the kitchen.
For instance, you’ll want to look at which design schemes are popular with buyers if you’re planning to sell – a current trend is earthy textures and contrasting colours. The key is to deliver a renovated home that looks ready to move into.
If you’re looking to rent, neutral shades may be the way to go, as they offer a simple and classy look and are durable, features that will appeal to tenants.
TOP TIP
The kitchen is one of the messier areas of the house, so it’s important to go for surfaces and paint that can withstand constant wiping and scrubbing without fading easily.
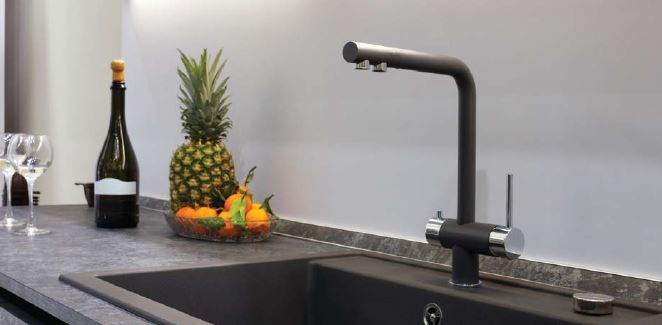
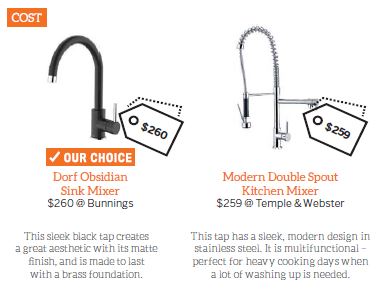 STEP THREE: MAKE THE TAP A CENTREPIECE
Taps don’t have to be a throwaway part of your kitchen’s aesthetic. With the myriad designs available, taps can actually become an attractive centrepiece of your design.
A snazzy-looking tap is the perfect thing to make an island bench pop if you’ve got a sink there, for instance. Black taps are rising in popularity as an elegant new alternative to the usual stainless steel and chrome.
Social media sites like Pinterest and Instagram off er great inspiration for how to feature tapware in your kitchen, and you can find low-priced taps in places like Bunnings.
TOP TIP
Just because you want the tapware to stand out doesn’t mean you need to spend a fortune. Beautiful sleek designs priced at around $200 can add wow factor, so unless the property is extremely highend, there’s no need to invest in $800 Grohe mixer sets.
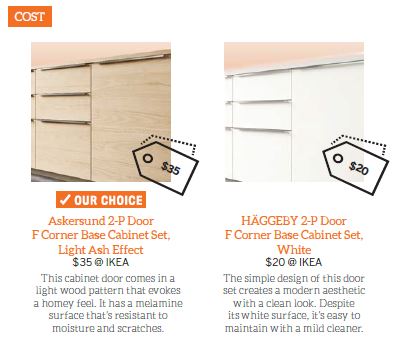
 STEP FOUR: CREATE BEAUTIFUL BENCHTOPS
A beautiful new benchtop is a great way to spruce up your kitchen without any structural work, which is especially useful if you’re on a budget. Laminate and stone are the most popular materials.
Stone looks great but can be very expensive.
Laminate benchtops are ideal for kitchens with a minimalist, basic design, and they are much cheaper. Laminates can also offer a stone-like finish at a fraction of the cost.
Other benchtop options include stone overlay, ‘self-cleaning’ timber and resurfacing, which involves using a roll-on product like Rust-Oleum’s Countertop Transformations to give your benchtop a new finish.
TOP TIP
If you’re looking to resurface your benchtop, make sure the original surface is smooth and clean – no cracks, chips, grease or dust – and that surrounded surfaces are covered. This gives it a highquality finish.

STEP FIVE: LIGHT IT UP
Good lighting is crucial in the kitchen, considering its purpose.
Thus you need to think about functionality and not just look.
“You want to make sure that work surfaces are well lit without casting shadows."
"Downlights positioned above benches and LED strip lighting recessed beneath overhead cupboards can add this practical aspect to your kitchen lighting,” Anglesey says.
Ambient lighting from pendant lights is ideal for areas of the kitchen you’re not cooking in,
such as an island bench, as this type of lighting makes the space feel warm and cosy.
It can help create a homey atmosphere suitable for entertaining.
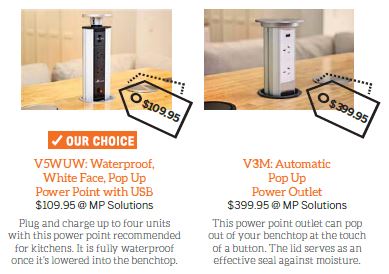 STEP SIX: INSTALL A CHARGING STATION
Given the heavy reliance of the kitchen on electricity, it’s vital to have a lot of power points installed. These need to be fi gured into your design so that their placement doesn’t inconvenience anyone or risk a safety hazard.
Power points are useful not just for appliances but because of the modern tendency to rely on gadgets as recipe sources.
“If you have an island bench, it’s a great idea to have a combination power point/USB charger installed at the end of the cabinetry to make sure the future inhabitants have somewhere to charge their phones and iPads while working in their beautiful kitchen,” Anglesey recommends.
TOP TIP
Always be mindful of spillage in the kitchen, especially near power points, as this could spell disaster. Even if the power point is waterproof, that can only prevent so much damage.
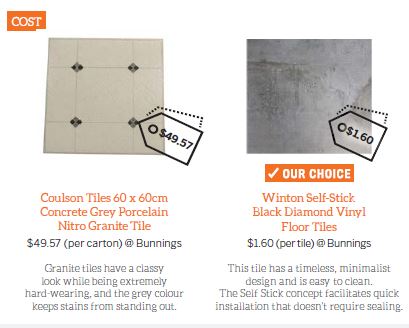 STEP SEVEN: UPDATE THE FLOORING
Durable, easy-to-maintain flooring is a must for a good kitchen. The typical choices of material are ceramic or porcelain tiles, hardwood, vinyl, laminate and cork – many of these are affordable and can take the inevitable spillage.
Vinyl flooring is a piece of cake to install and can simply be laid over existing flooring that’s in good condition. Laminate flooring comes in boards that are easy to lay down and looks great but is more sensitive to water and moisture, even if it is stain and scratch resistant. Ceramic tiles are extremely durable and only need to be sealed properly to avoid getting grease in the grout joints.
TOP TIP
The kitchen floor should be built to withstand constant cleaning, so make sure that tiles are glazed. Reseal tiles approximately every three years to maintain the protective layer, and always have replacement tiles on hand just in case.
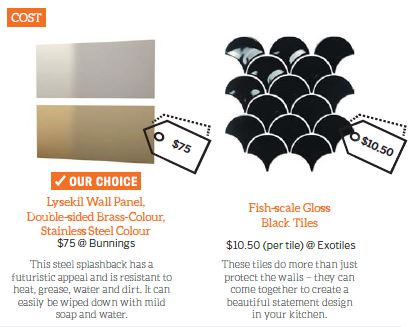 STEP EIGHT: CHOOSE THE PERFECT SPLASHBACK
The right splashback can serve as the ultimate exclamation point to a renovated kitchen. It can be the focal point of the design, or bring together all the design elements.
To tie things together, you can use the same material on your benchtop and splashback. The key is to ensure that it is great at absorbing kitchen messes. Common materials include tile, glass, acrylic, stone and steel.
Metal has become a hit for its sleek, modern design and durability, while tile is the easiest to maintain and the most versatile.
TOP TIP
To clean your splashback, spray it with a non-abrasive all-round cleaner and leave it on for 20 minutes. This allows the cleaner to penetrate the surface. Then use a non-abrasive rag to wipe it down.
CASE STUDY
Julie Anglesey maximised available resources to save money and stay within budget on her kitchen renovation
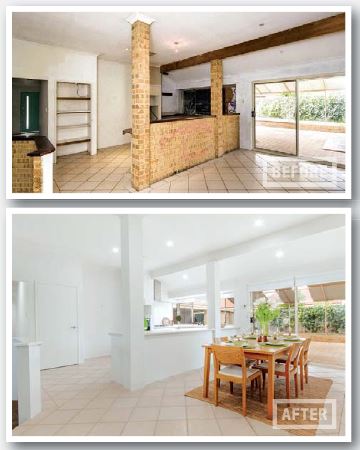
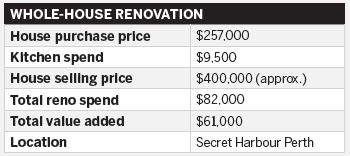
With over five years of personal and professional renovation experience, Anglesey was aiming to turn a generous profit when she embarked on a signifi cant kitchen renovation in a rundown property in Secret Harbour, Perth.
The space was large, with many cupboards.
Anglesey’s original plan was to retain the cabinets’ foundations, but she quickly found herself having to adjust.
“The original bench and cupboard doors were unsalvageable. Due to my target market’s expectations and the scope of new features being added in the rest of the house, I decided that new cabinetry was necessary,” she says.
Anglesey quickly grew concerned that she would miss the mark on her set budget of $9,500, but she stood firm.
“By holding my nerve and keeping my budget clear in my mind, I was able to find an affordable cabinetmaker who custom-made my cabinets and doors – and I was very happy with the result!”
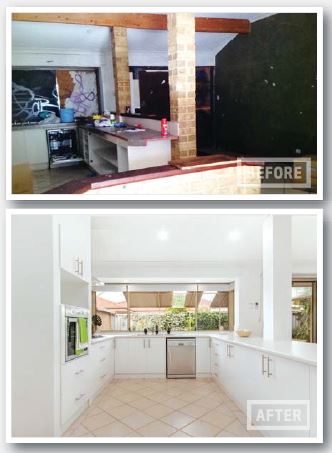 The unexpectedly heavy cost of the cabinets interfered with Anglesey’s vision of getting double ovens, but she addressed the issue by getting a new oven from a discount store, keeping to the budget while meeting her target market’s expectations. She also decided to keep the original kitchen layout but ran into an issue with the old not fitting with the new.
“Since this was a quick-flip renovation, the benchtop manufacturers had to measure the new benches whilst the old window frames were still in place. Unfortunately, when the new benches were installed, there was a small gap between the bench and the new window frame where they were supposed to meet.”
Instead of panicking, Anglesey and her team installed some quarter-round moulding and silicone, making sure the gap would be watertight.
Overall, Anglesey says the renovation was a huge success that reflected her vision.
“The entire transformation was a massive highlight,” she says. “The day I walked into the kitchen as the dark boards on the window frames were being replaced with clear glass windows was very exciting! I could finally see the outlook I had visualised for so long, and I knew this room would be as beautiful as I’d imagined.”
Julie created a bright, fresh and open kitchen space in her Perth investment property, which helped her achieve a six-figure profit.
 Julie Anglesey
is a seasoned
renovator who has
been on the job for
six years with her
company Renovating
Made Easy